Saturday, May 9, 2020

Dollhouse: How To Make Hardwood Floors From Popsicle Sticks

Hello, my name is Candy Rosenberg.  I am known as "A Vintage Girl," in the craft industry.  However, I recently became a member of the Proxxon Tool Design Team, I got my table saw and sander last week. I am new to the rabbit hole I call my new obsession, dollhouses, and miniatures.  I was wondering how I was possibly going to make tiny things without tiny tools, well that is where Proxxon comes in.  These tools are just as strong and durable as their larger counterparts and make a hobbyists work so much easier.  Here are the two tools that I received to share with you, the Table Saw EFT and Delta Sander.
I will be sharing my dollhouse adventures the second Saturday of each month, looking forward to throwing down some serious projects!


I am in the flooring stage of my dollhouse, a Colonial-style house that I purchased pre-built on the main structure.  The walls, stairs, windows, and doors were all in a bag.  This allows me to work on the walls and flooring before putting walls up.  I know I want hardwood floors pretty much throughout, so off to my Dollhouse Facebook Groups for some research.  Popsicle sticks and coffee stirrers were the answer.  So many different ways to do it, but you do have to cut off the rounded edges.  The Proxxon table saw is perfect for this task.

This is a quick 2-minute video showing you the actual cutting of the popsicle sticks to see how easy and fast it was to create the pieces for the floor.  


This is my current dollhouse, I have 5 more in boxes ready to go after this one.  It is a large one and is a Colonial style.  We will be working on the floors, paneling for the walls and shutters for the windows next.  So be sure to come back the second Saturday of each month to see what I have accomplished.


In all my research, because I will be honest, I am new to dollhouse construction so I had to find information on how best to do the hardwood floors.  One of the key elements is to put it on something then put in the dollhouse so that you are not stuck with it forever.  This is my first try, so bear with me.  I grabbed a Fedex envelope because it is so thin once you cut it open.  I used this for my template.


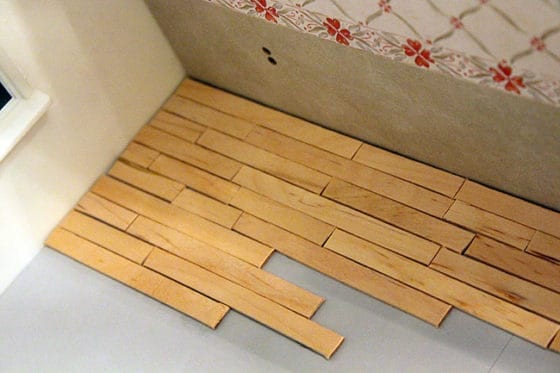
Using Beacon Adhesives Timber Grip wood glue, I applied the pieces of cut popsicle sticks.  Remember to sand down the ends first.


Start laying out your pattern.  Most popsicle sticks have varied colors so keep that in mind as you apply them to your template.


There are many more steps once you get the floor down, there are so many options for finishing it.  This photo is from Meaningful Mama, a dollhouse blog.  Mine will not be finished for several weeks, but I will be sure to share it when it is done.
Best DIY Dollhouse Furniture


Thank you for stopping by and welcome to my Rabbit Hole!

Wednesday, May 6, 2020

Birthday Gift Bags with Wood Scraps

Hi everyone, Steph Ackerman here today with showing you how to use scraps of wood to decorate gift bags.


While we are home bound and parties are put on hold, our lives go on and that includes birthdays.  So I decided to take this time to create gift bags for those individuals we can't see and celebrate with at this time.


Using some left over scraps of wood, I used the Scroll Saw to cut the wood into party hat shapes then used the Delta Sander to sand down the rough edges.


After painting each with Plaid paints, I stamped and embossed each with a party stamp.  Then I used the Bench Drill Press to put a hole in each through which I threaded twine.


After decorating the gift bags, I tied the wood scraps to the handles like gift tags.

Thanks for stopping by.


Sunday, May 3, 2020

How to Make a Wooden Letter Opener

A lovely letter opener is a graceful addition to any desk. This hardwood letter opener is easy to make and sure to bring satisfaction when using it.

Supplies and Equipment for Making the Letter Opener

Instructions for Making the Letter Opener

  1. Draw your desired letter opener shape to fit the wood blank.
  2. Mount the pattern on the blank. To mount the pattern on the blank cover one side of the blank with painter's tape. Mist the back side of the pattern with spray adhesive, and mount on the taped blank. The painter's tape made removal of the pattern easy without leaving any sticky residue.
  3. Cut the straight edges on the band saw.
  4. Cut any curved edges on the scroll saw. 
  5. Adjust the angle of the table on the disc sander to its lowest position. Sand the edges of the shape to form a tapered edge for slicing open envelopes.
  6. Sand all surfaces with progressively finer grits of sandpaper using the Delta sander.
  7. Polish the finished letter opener with paste wax, treat with wood oil, or finish as desired.
  8. Enjoy!!

Friday, May 1, 2020

Easy to make garden hose organizer

Hi everyone.
     Hey, I had a little problem this week.   I was working in the garden and decided I should lay down my soaker hoses for later in the summer when it gets so hot and the garden needs some water.   We have planted some tall "crops" this year such as climbing beans so we have standards and cages in the garden.  This makes watering by spray difficult.   Ok that is the background.   The problem was that the hoses are in a tangle and unless they are straightened out they won't work properly.  Planning ahead for fall when I will need to put them away I decided I should straighten them out now and plan something better for putting them away this fall.   So here is the project.  I made it super simple but it works great.   And it was so easy using my Proxxon tools.  I must admit I use them just about everyday for any number of things.


Here is the final project

Let's see what we need to get started.

I used wood scraps.  The pieces need to be at least 3 1/2" wide and 12-13" long
2 wooden dowels about 12" long    (diameter1/4"-1/2")
drill with drill bit the same diameter as the dowels.


I cut out a big "H" shape from my wood piece.   I made the channel about 1 1/2" wide and left about 3" in the middle.   I used the Proxxon mini bandsaw.   Took about a minute as there is no need for fancy measuring.   Shown below are 2 of them.   I made 4 for my 4 soaker hoses.   Once wound up they will stay on my new "contraption".  😀
  

As you can see in the picture above I drilled 2 holes where I will insert my dowels.   Note that the dowels are just outside the middle area.

The dowels fit quite tightly, which is what I was aiming for.  I want them secure when I am using the contraption but I want to be able to slide them out also.  Do not glue them.


I used the Proxxon OZI/E delta sander to take off any splinters.  I like my wood smooth.


To use this thing, just slide the dowels in the holes so that they are equal on both sides.   Secure the end of the hose as seen below and wrap your hose round and round.


Next I used a piece of cord to tie it tight.   Then Iyou can remove the dowels and use them on the next hose winder thing we just made.  You probably guessed but the dowels are just there when winding to keep the hose from slipping off itself.    After removing the dowels and tying it up the hoses store flat and will be easy to lay out in the garden next spring.


Little by little I am getting things organized.   I love using my Proxxon mini tools to make useful items.  

Thanks for visiting.  I hope you found this helpful.  You can also use this idea for storing long extension cords when not in use.   I enjoyed this project and am pondering my next project.  Hope to see you back soon.   take care...
Thanks to Proxxon,   I couldn't make stuff without your nifty tools!!!

Sunday, April 19, 2020

How to Make Your Own Peg Puzzle

If you love puzzles, this peg puzzle is just the project for you!! It's sure to provide hours of fun and amusement. And they make quick and easy gifts for your puzzle-loving friends and family.

The game board is a triangle with 15 evenly spaced holes. Start the game with pegs in all the holes except one—any one. The goal is to jump pegs one at a time, removing the jumped peg until only one peg remains.


Supplies and Equipment for the Peg Puzzle

Instructions for the Peg Puzzle

  1. Print the pattern and mount on wood blank. To mount the pattern on the blank cover one side of the blank with painter's tape. Mist the back side of the pattern with spray adhesive, and mount on the taped blank. The painter's tape made removal of the pattern easy without leaving any sticky residue.
  2. Cut the triangle shape using the bandsaw or scroll saw.
  3. Fit the professional rotary tool with a brad point drill bit in a size suitable for your choice of pegs. Use the adjustable fence on the drill stand to perfectly align the rows of holes. Drill the holes.
  4. Sand the surfaces using the disc sander.
  5. The finished puzzle board can be painted or treated with wood oil or paste wax.

Carole

Friday, April 17, 2020

How to make colorful garden stakes

Boing...Boing...Boing...  Spring is sprung and I am so Happy.    I have an easy and fun project today that won't take too long to make and will really spruce up your vegetable garden.   We are going to make garden stakes so we, (I mean I, and if you are forgetful, then you too), won't forget what we planted where. 


Let's gather our equipment and supplies:


wire cutter
pliers
pencil, paper, and carbon paper
1/4" plywood scraps
old wire coat hangers or stiff wire


      Plaid paints

  • Pumpkin Orange 20588E
  • Green Forrest 443
  • Burgandy 957
  • Palm Leaf 21477E
  • White 200503E
  • Succulent 2637
The first thing I did was to draw out some simple patterns that I thought I could use as garden stakes.   Then using some carbon paper I traced them onto my wood pieces.


Using the Proxxon mini scroll saw, I cut them out.  


Using Proxxon's mini drill press I drilled a hole into each of my vegetables.


Next I sanded them well using the Proxxon OZI/E delta sander.


On to the hangers

Using the wire cutters cut off the hook part of the clothes hanger.  Then bend the wire into the shape of a shepherds hook ↓


Paint your veggies!  I always use Plaid paints


Now they are ready for the garden!


So that's it.   I need a few more for my garden.   Thank you so much for visiting.  
Have a lovely spring!        catch ya next time    Carol

Thanks to Proxxon and Plaid

Thursday, April 16, 2020

How To Make A Candle Sconce


   Hi everyone! Continuing on with working on a few things for my powder room. Today I'll be making a candle sconce.  Let me show you how I did it.

Supplies:
  Proxxon Micro Band Saw
  Proxxon Drill Press
  Proxxon Delta Sander
  3/4" scrap pine
  Wooden candle cup
  Plaid paint black
  Plaid Inspirations clear wax

1. I drew out a pattern on paper

2.  Transferred my pattern to the scrap 3/4" pine board.                                                                       
                                                                                                           
3. Using the Proxxon Micro Bandsaw I cut out both pieces.                                              


4. I sanded the pieces using the Proxxon Delta Sander                                                                            


5.  I then attached  the wooden candle cup to the base using a wood screw .                             .           
                               

6.  I drilled a hole for hanging using the Proxxon Drill Press.                                                              
                                                 

 7.  I then glued and nailed the base to the back.

8.  Paint with black Plaid paint and wax with clear Plaid Inspirations Wax.                                           


Thanks for following along with me.... Colleen